Cranberry Pear Chutney

This is a recipe you don't feel bad making ahead of time.  I have a thing where I want everything to be served fresh, but this one does not have to be.  You can serve a little chutney with dinner, but will double as a appetizer when poured over a block of soft cheese to serve with nice crusty bread or crackers.  If your lucky enough to still have some around, spread on a left over turkey ciabatta sandwich on Friday.


Cranberry Pear Chutney
Print recipe here

¾ cup fresh apple cider
¾ cup fresh orange juice
1 TB cider vinegar
zest of 1 orange + the orange, cut small and all white removed
1 cinnamon stick
4 whole cloves
¾ cups rapadura (or brown sugar)
12 ounce package fresh cranberries (about 2 cups)
1 firm but ripe pear peeled, halved, cored and cut into 1-inch cubes

1. In a medium saucepan over medium-high heat, combine the apple cider, orange juice, cider vinegar, orange zest, cinnamon stick and cloves.


2. Bring to a boil, reduce the heat to medium and simmer 10 minutes. Stirring occasionally, until reduced to 1 cup.
3. Stir in the brown sugar until it dissolves, about 2 minutes.


4. Add the cranberries and pears and return the mixture to a boil. Reduce the heat to low and simmer, uncovered, stirring occasionally, until the flavors have blended, 20 to 30 minutes. The fruit will be quite soft. (I love the sound when the cranberries pop!)


5. Pour the chutney into a jar or bowl and stir with a fork, crushing some, but not all, of the fruit. Let cool completely before serving. The chutney can be tightly covered and refrigerated for up to 1 week.


6. Serve with turkey, lamb, pork tenderloin. Pour over soft cheese with crusty bread or crackers. Spread on muffins or leftover turkey sandwich.


Today's recipes where brought to you by, inspired or adapted from:   Williams-Sonoma

'Sugar Plum Fairy' Pudding Cake

I have a mouse in my house...a Nutcracker Mouse!  My Girl is performing in The Nutcracker Ballet this weekend with Twin Cities Ballet.  It is also The Cake Slice Bakers time, this month is Cinnamon Pudding Cake.  More appropriately for us to celebrate her debut in the Nutcracker this week...it is Sugar Plum Pudding Cake.  I am baking this on our only non-rehearsal night this week!  Perfect to keep the theme flowing, now if I can just get her to stop twirling and leaping around the kitchen for a second...ohhh what a cute little mousy in my kitchen.

Cooking Confession #3-  I am a constant oven peaker, I know so bad!   It lowers the temperature of the oven, messing with the baking and effects the outcome.  Do not do this!  Turn the oven light on, peak through the dirty window and wait it out.  "Patience is passion tamed." - Lyman Abbot

The old fashioned definition of "Sugar Plums" is any dried fruit, I think that dried dark cherries, golden raisins or cranberries would be very good in this recipe too.   This pudding cake creates a sweet caramel glaze over the top like magic.  Moist, easy, spiced cake perfect for your "Sugar Plums".


'Sugar Plum Fairy' Pudding Cake
Print recipe here

Sugar Plum Pudding Topping
20 dried plums, halved (sounds better than ole’ lady prunes right?)
1 C + 2 TB packed organic light brown sugar
¾ C fresh apple cider
2 TB unsalted butter
¼ tsp celtic sea salt

Fairy Cake Batter
2 C soft white wheat pastry flour, unbromated and unbleached
2 tsp aluminum free baking powder
2 tsp Vietnamese Cinnamon
¼ tsp allspice
¼ tsp ground nutmeg
½ tsp celtic sea salt
3 TB unsalted butter, softened
1 C sucanat (sugar)
1 TB apple cider vinegar (with the mother)
1 C (scant) whole milk
1 tsp pure vanilla extract

1. Heat the oven to 350 degrees F. Butter bottom and sides of an glass pie pan liberally.  Don't be skimpy here or you will regret.


2. Combine the brown sugar, apple cider, butter and salt in a small saucepan and bring to a boil, whisking occasionally, pull off burner once boiling and starting to rise. Set aside to cool.  Careful!  Do not leave unattended, this will go from cold to boiling like mad quickly and if left will boil over and smell like a 3rd grade science class. 
3. Prepare your “buttermilk” by pouring the vinegar into a 1 cup measuring cup. Then add your milk to equal one whole cup for the recipe. Set aside to let sour for 5 minutes.


4. Combine the flour, baking powder, cinnamon, allspice and nutmeg in a medium mixing bowl.
5. Combine the butter and sugar in a large mixing bowl and cream with an electric mixer on medium-high speed until fluffy, about 2 minutes.
6. With the mixer on medium-low speed, add a third of the flour mixture to the bowl. Add half of the milk and the vanilla. Add another third of the flour, followed by the remaining milk and the rest of the flour. Scrape down the sides of the bowl and beat on medium speed for 30 seconds.


7. Scrape the batter onto the prepared pan and smooth the top with a rubber spatula as level as you can get it.


8. Push the dried “sugar plums” into the batter to be level.


9. Pour the topping over the batter (the pan will be very full). Carefully transfer the pan to the oven and bake until set, 45 minutes.  (CC#3)


10. Let the cake cool in the pan for 15 minutes, invert it onto a large rimmed serving platter and serve warm. Beware because the gooey, yummy, glazed caramel pudding will leak around the cake.


11. Let any leftover cake cool completely before storing in an airtight container at room temperature for 1 day or in the fridge for up to 3 days.


Today's recipes where brought to you by, inspired or adapted from:

and    Cake Keeper Cakes: 100 Simple Recipes for Extraordinary Bundt Cakes, Pound Cakes, Snacking Cakes and Other Good-To-The-Last-Crumb Treats

Pho Bo- Vietnamese Beef Noodle Soup

Good Morning all the Egg Timer readers! 

You are becoming a larger group everyday!  I am so very thankful for all of you.  Thankful for all of the new followers and feed subscribers.  Thankful for the great bloggers who have welcomed me with encouraging and warm arms (or emails). 

What do you cook for Thanksgiving?  Most families will do the turkey, potatoes, gravy, yams, pumpkin pie, etc...  Some do not.  Especially if you or your parents were not born or from the U.S.  Many families will be cooking their traditional meals from where they are from.  Maybe you have some that you add to your table along with the turkey?  Vietnamese are known for Pho Bo, Vietnamese Beef Noodle Soup.  I made this for for my family this weekend, amongst many weekends.  I used to be very intimidated by making Pho.  (Pronounced "Fuh?" Say it like you are asking a question).  It's quite easy to make once you break it down.  It is a very warming yet light soup, perfect for any weekend to stay home and impress your loved ones.


Pho Bo- Vietnamese Beef Noodle Soup
Print recipe here

3 lbs grass fed beef soup bone- neck, rib, marrow, oxtail
1 lb eye of round, top sirloin, flank steak or tripe beef- sliced paper thin (Kitchen Technique #7)
2 package of asian beef meat balls or beef tendon meat balls (Thit Bo Vien), in freezer section


2 package of Vietnamese Flat Thin Rice Noodles (Banh ho Tuo)- buy the ready-made ones in the refrigerated section


2 stick of cinnamon
18 cloves, studded into an onion
8 star anise pods
1 tsp coriander seeds (mounded tsp)
1/8 tsp cardamom seeds or 3 cardamom pods (mounded tsp)
A 3-inch knob of ginger
6 cloves of garlic
1 large carrot, cut into 3 inch sections


1 medium daikon, cut into 3 inch sections (looks like a albino carrot)
2 tsp salt
1/2 tsp raw cane sugar


Bean sprouts
Cilantro
Thai basil (This is the purple stem one)
Vietnamese Sawtooth herb, also call Culantro (not to be confused with Cilantro)
Onion, sliced paper thin
Green Onion
Limes, halved then quartered
Hoisin Sauce
Sriracha Chili Sauce
Jalapenos or Serrano peppers, sliced


Day 1:

1. Wash beef marrow bones and place them in a large sauce pan or small pot, pour water to cover. Bring to a boil over high heat, once boiling turn down to medium heat and continue to boil for 10 minutes. This allows the bones to release any impurities, the “gunk” will rise to the surface of the water and look like a very dirty bubble bath. (Ew,this is why you should use grass fed organic beef, especially when using soup bones. It yields much better broth flavor too.)


2. While the beef bones are boiling. Time for prep. Turn oven to broil, cut 1 large onion in half , two 1 inch pieces of ginger and place on a baking sheet. Broil in oven for 10-15 minutes checking and turning halfway through. They should be nice and roasted. Remove from oven and set aside.  If you have a gas stove or live somewhere warm all the time and can get to your gas grill- you can roast and toast these over a flame too.

3. Now in goes all the spices. Place cinnamon stick, cloves, anise, coriander and cardamom on baking sheet and broil for 3-5 minutes to a slight char. Remove from oven and place into a large metal, mesh spice/ tea ball. Set aside.  Same goes for these if you have a gas stove or grill.

4. Remove bones with tongs, rinse them and place into a clean larger stockpot. Place carrot, daikon, garlic, salt and spice ball into the pot. Fill the pot with water until it is 1 inch from the top! Turn the heat to high again and bring to a boil. Once water is boiling, turn down to medium-low and simmer for a minimum of 2 hours. Longer the better....like all day...


5. When done simmering, turn off heat, remove from hot burner and let cool. Cover with lid (or dinner plate) and put into the refrigerator overnight.  And if your us- eat a bowl.


Day 2:

1. In the morning when you wake, check on your broth and the fat will have raised to the top and hardened for easy removal. Just scoop off with a spoon ad toss.

2. Place stockpot back onto the stove and heat over high heat. Once again, when boiling turn the heat down to medium-low to simmer for another minimum of 2 hours up to all day long.

3. When you are ready to eat, remove bones from soup. If there is any meat left on the bones, remove and put back into the soup. Cut meatballs in half and add these to the broth also.


4. It is now time to slice the other beef- eye of round, top sirloin, flank steak or tripe beef- sliced paper thin (Kitchen Technique #7). Put the thawed beef into the freezer for 10 minutes to firm up before slicing. This will allow you to cut the beef very thin without it getting all wiggly and mangled on you....much easier! Use this technique for stir fry too! When sliced, place onto a plate and set aside.

5. Prepare your fresh veg/ herb plate. On a large plate put some sprouts, cilantro, Thai basil, culantro, onion, green onion, limes and jalapenos. Place your Hoisin Sauce and Sriracha Chili Sauce on the table.

6. Turn the burner back up to high heat to start putting the bowls together. In a large soup bowl place the prepared refrigerated noodles and desired amount of raw slices of beef. Once broth is boiling, ladle the hot broth and meatballs over the noodles and beef. The beef slices will now cook (don’t worry! I would never tell you to eat raw meat).

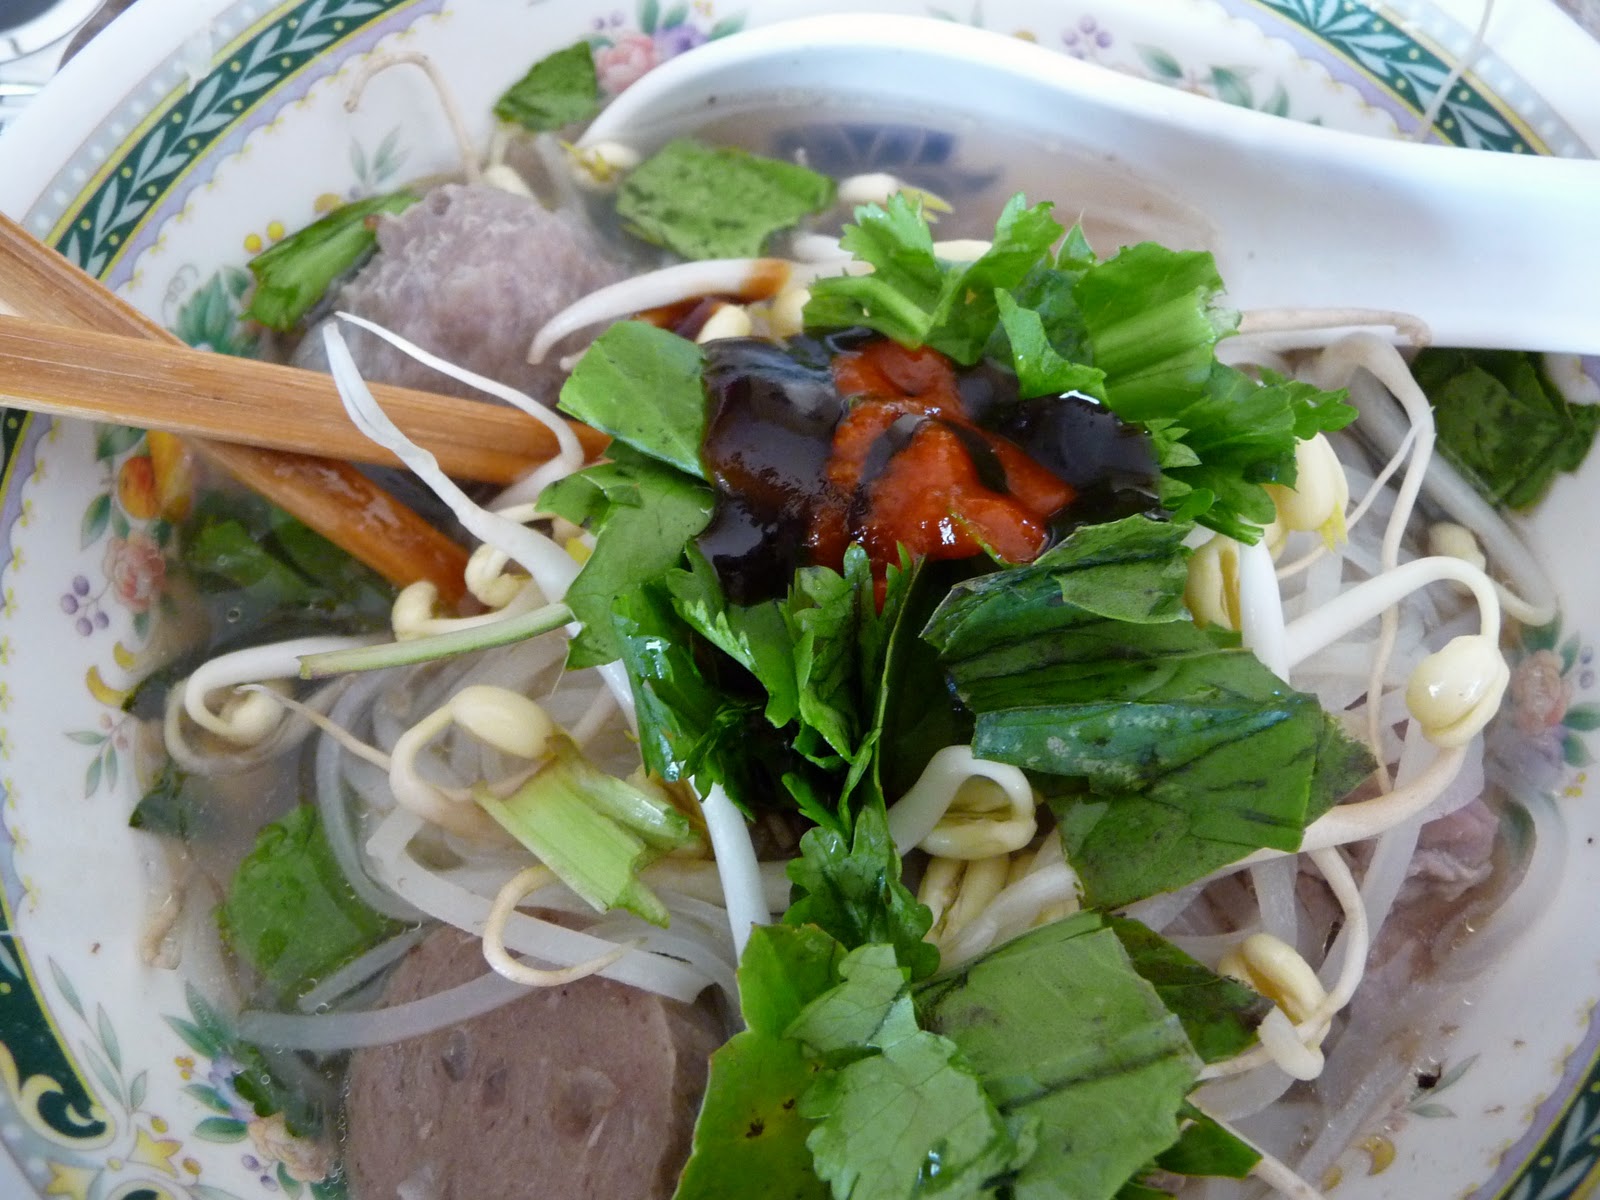
7. Find your spot at the table and top your bowl with all the fresh veg/ herb you wish. Squeeze a bit of lime, Hoisin, and Sriracha and stir.

8. Eat with chopsticks and an asian soup spoon. Phew!  Now go enjoy your nourishing bowl of Pho, you deserve it!


Do you add any culturally traditional or special dishes to your Thanksgiving table?  What will you be making next Thursday that might be different than other tables?


Today's recipes where brought to you by, inspired or adapted from:  The Wandering Chopstick, thanks for the great instructions and helping me defeat my fear of this easy meal.

Would you like some coffee in your cream?

Alright, so I love fresh coffee with a little cream.  But after tasting this, I love fresh cream with a little coffee! 

The flavored creamers that you buy in the grocery stores are sooooo bad for you!  Did you know they usually don't even contain cream in them at all?  Many popular brands contain bad oils and horrible ingredients.  Don't even get me started on the sugar free ones!  Yucky!  Why would I buy a bottle of "creamer" that does not contain any cream!  These recipes taste so much better and is much better for you.  Take this as a base and experiment until you find your perfect little cloud of happiness that you can pour in your favorite mug.  Remember mine?  It still makes me happy!  As far as the option I listed for milk and sugars, it is all personal taste and allergen based.  I have used all of them and like all of them equally.  I basically use whatever is already open in my fridge for milk and sweetener depend all on what I feel like adding...totally random. 

Which also bring me to Kitchen Technique #6-  Grade A Maple Syrup has less maple flavor, more sweet, thinner and lighter.  Grade B Maple Syrup has more maple flavor, less sweet, thicker and darker.  Choose based on how much maple flavor you want...or in my case, go with what you have in your pantry.  More recently my pantry contains the latter- Grade B Maple Syrup is divine!  From a health perspective it contains more mineral content too.

Serve this on your holiday table before your large meal and with your huge piece of holiday pie.  I hope you and your guests enjoy them as much as I do!


Homemade Coffee Creamer: Holiday Pie Edition


Pumpkin Praline Pie Creamer
Print recipe here

1 cup whole milk, almond milk or coconut milk
1 cup heavy whipping cream
1/2 C sucanat/ raw cane sugar, 1/4 C pure maple syrup or 1/2 tsp stevia (KT#6)
3 TB pumpkin puree
1/2 tsp Vietnamese cinnamon
1/2 tsp pumpkin spice
1 1/2 tsp butterscotch extract
1/2 tsp vanilla extract

1.  Whisk together milk, cream, sweetener, pumpkin and pumpkin spice in a medium saucepan over medium heat.


2.  When mixture begins to steam up from pan, remove from heat and stir in butterscotch and vanilla extract. Pour into a glass bottle and store in the refrigerator. Use according to your own taste in coffee, hot cocoa, ice cream, oatmeal, french toast...


Coconut Cream Pie Creamer
Print recipe here

1 cup whole milk, almond milk or coconut milk
1 cup heavy whipping cream
1/2 C sucanat/ raw cane sugar, 1/4 C pure maple syrup or 1/2 tsp stevia (KT#6)
2 tsp coconut extract
1/2 tsp vanilla extract

Whisk together milk, cream and sweetener in a medium saucepan over medium heat. When mixture begins to steam up from pan, remove from heat and stir in coconut and vanilla extract. Pour into a glass bottle and store in the refrigerator. Use according to your own taste in coffee, hot cocoa, ice cream, oatmeal, french toast...


French Silk Pie Creamer

1 C whole milk, almond milk or coconut milk
1 C heavy whipping cream
1/2 C sucanat/ raw cane sugar, 1/4 C pure maple syrup or 1/2 tsp stevia (KT#6)
2 TB unsweetened cacao powder
2 tsp almond extract
1/2 tsp vanilla extract

Whisk together milk, cream, sweetener and cocoa powder in a medium saucepan over medium heat. When the mixture begins to steam up from pan, remove from the heat. Stir in almond and vanilla extract. Pour into a glass bottle and store in the refrigerator. Use according to your own taste in coffee, hot cocoa, ice cream, oatmeal, french toast...


How To: Make a Latte
Print recipe here

1.  4 TB of your favorite creamer in a coffee mug.


2.  Use this "Whizzer" or more appropriately Milk Frother.  Just before you pour the coffee in, place the Whizzer down in cup and into the milk, whip for about 20 seconds until the milk begins to froth and thicken.


3.  Turn the Whizzer off before removing from milk, pour fresh strongly brewed coffee over top and watch magic happen! 
Top with whip cream, cinnamon, pumpkin spice, nutmeg ,cocoa or vanilla sugar if you desire. 


4.  Repeat.


What is "The" pie that will make you cave and stuff more down your throat even though you cannot fit in another bite after Thanksgiving or Christmas dinner?  I would love to know!
And...How do you like the new look?!?!


Today's recipes where brought to you by, inspired or adapted from:  Deliciousley Organic


Homemade Chicken Noodle Soup: The Cheatin' Edition

This is not a good reason for a post, but a good reason for a good recipe.  A perfect recipe blog paradox?  Well, maybe that definition is a little dramatic but if you know me...it fits.

My Girl, was so healthy-so far-so good since the start of the school year.  Until she got attacked by the garage floor and broke her humerus...not funny!  If it weren't for the 2 hour wait in the ER, I would not have sat down in there.  Almost knowing we would be sick within 72 hours of leaving.  Well, we are all fighting something hard, but My Girl is getting a little beat up with all her might going to heal up her injury.

Perfect time for making some old fashioned healing soup.  This is a Cheatin' version because technically I am not boiling a whole chicken with the bones all day long to extract the flavor for the broth.  I will do that someday, just not today.  Now would be the perfect time to use left over from your Faux-tisserie Chicken.  This version also has a lot of garlic and oregano, they both carry very high antibiotic, antibacterial, antiviral properties- great for fighting off bugs and symptoms. 

Go ahead with that mound of garlic, your sick already, no one is going to want to come near you anyways!

Eat two of these and call me in the morning.
 Homemade Chicken Noodle Soup: The Cheatin' Edition
Print recipe here

4 TB pasture butter, divided
1 TB garlic, minced
1 pound free range, organic chicken breast, sliced long into tenders for quick cooking
2 tsp celtic sea salt, divided
1 tsp black pepper, divided
1 medium yellow onion, diced
4 stalks celery, diced
1 cup carrots, diced
2 TB dried oregano (I know! Just trust me here...)
1 TB dried parsley
1 tsp dried thyme
pinch of sugar
3 -1 QT boxes (or 12 C) organic low sodium chicken broth
1 C water
16 oz package Reames Homestyle Egg Noodles, in freezer section

1. In a large soup pot, melt 2 TB butter and 1 TB garlic over medium heat, saute one minute or until garlic is golden and fragrant.


2. Add chicken, 1 tsp salt and 1/2 tsp pepper. Cook until no longer pink through center, about 8 minutes. Remove and set on a plate to cool.


3. Add 2 TB butter and diced onions to pot, saute 5 minutes. 


4.  Add diced celery, carrots, oregano, parsley, thyme and sugar, saute another 5 minutes.


5. Shred cooled chicken, add to pot. Cook 2 minutes or until heated through.


6. Pour in the chicken broth, water, rest of salt and pepper. Turn heat up to high and bring to a boil.


7. Turn heat to medium- low, add noodles and simmer 20 minutes, stirring occasionally. After 20 minutes, remove from burner or the noodles will become the size of your mattress! Add any more salt and pepper to taste.

Best served with grilled cheese, made with sourdough bread and aged provolone cheese. Yum! 


Thank you for visiting me @


Today's recipes where brought to you by, inspired or adapted from:  Saved by the Egg Timer: Original


Faux-tisserie Chicken

Do you ever get really hungry for Thanksgiving dinner right before Thanksgiving? We do around this house.   This is a great way to make a whole chicken. Rotisserie makes such a juicy chicken to eat with sides like potatoes and gravy, shredded for enchiladas, make a chicken salad, pulled meat sandwiches, chicken soup, pot pie or a Midwest Haute Dish!


Faux-tisserie Chicken
Print recipe here

1 whole chicken, small enough to fit in your slow cooker
1- 2 TB of Homemade Seasoned Salt, be generous but to your own taste
3 large pieces aluminum foil

1. Prepare your slow cooker by taking 3 pieces of aluminum foil, crumple them into 3 balls. Toss into the bottom of your slow cooker. The foil balls will hold your chicken up out of the juices that drip.  Remember to save the juices afterwards!


2. Now prepare your chicken. "Rinse it, pat it, and mark it with a C..." Rinse out the whole chicken, remove any bags or necks, etc from inside, rinse and drain out. Pat chicken with paper towels to dry.


3. Place the chicken on top of the aluminum foil balls and into your slow cooker breast side up. Very carefully pull the skin up all around the chicken. It took me years to be able to do this as I still hate touching raw meat and thinking about meat in general. Squeamishly rub about 1/2 TB seasoned salt underneath skin. Pour 1/2 TB seasoned salt into cavity. Rub 1/2- 1 TB seasoned salt on outside of the bird all over, underneath, sides, wings, and top.


4. Cover and set to low. Leave it alone for 7-8 hours.

Almost done...getting hot and steamy in there!
5. Be careful when you take it out, this tender chicken will literally fall off the bone when you take it out. Transfer to a plate and serve.
 
Look how tender this is!
This is a seriously delicious and juicy way to make chicken.  I highly recommend it!


Thank you for visiting me @


Today's recipes where brought to you by, inspired or adapted from:  Our Best Bites